If you have read about my
emergent literacy approach and you are wondering what to do with students who are more conventional readers and writers keep reading to see how I implement it in my classroom.
I have to be honest, I actually have both emergent and conventional readers in my groups so my conventional readers still do some emergent stuff (they love it), which is okay! All of my students have complex communication needs and are learning to use AAC and Core Vocabulary. With this I am able to differentiate and model a ton during my lessons.
Reading
During reading instruction I use Unique Learning System (ULS) and pull some of my favorite highly engaging read alouds from my shelf. In my classroom I choose to use the same story M-F but you could change your story multiple times per week if you had the time. As mentioned before, reading instruction is a great time to model core vocabulary and AAC. When working with my conventional readers I follow the Anchor, Read, Apply model.
Before Reading: This is our ANCHOR activity. This is where I get the kids thinking about the topic/or strategy we are working on. For example, if I want the students to be able to sequence the events in a story we will do a simple sequencing activity. I would pull activities (maybe 3-4) from their daily schedule and have them put them in order. During this time I am making sure to use the vocabulary I am wanting them to learn. In this case it would be "sequence". So I would say "I like the way you are sequencing the things you do during the day" "I see that you have breakfast first, reading second and recess third" etc. This is a quick activity so I spend about 10-15 minutes on this. (My emergent students are working on self selected reading during this time).
During Reading: This is the READ part of the model. I have all of my students and we get cozy in our group reading area. All of the students have access to high and low tech AAC. I begin reading the story. Making sure to introduce it and spend time talking about the author, illustrator and making comments about the title/cover. I will also try to have the kids infer if appropriate. I use the CORE board during reading instruction and model using the the C.A.R method.
Keeping the conventional literacy students in mind I will be sure to reference our anchor activity new vocabulary. So again if we were working on sequencing and we were reading a story about giving a dog a bath I would say "First we find the dirty dog", "Next we...." etc.
After Reading: This is when we APPLY what we have learned. I will generally use the same activity from the Anchor but change the content to match our story. So if we were going to sequence how to clean a dog I would be sure to print out pictures and have the students sequence them.
Due to the nature of my classroom it usually takes me 3-4 days to complete all of these activities.
Writing
During writing instruction we are working on a lot of different skills. We do small group and individually writing. This is where my conventional students still do the predictable chart, cut up sentences......and making the book as my emergent students do. They just get additional writing throughout the week.
Word Wall: I introduce new words to add to our word wall weekly. At this time we are working on adding 5 new words a week. When selecting these words I pick 3 core words and then 2 words with common rimes (in this picture I chose 2 core words and 1 color word...there can be exceptions :)). When selecting the rimes I use this chart.
Instead of teaching the rime I add an onset and make that the word the students use (you will see how the rime comes into play later). So in the instance of the words below I chose the rime "ore" and "eat". I use the word more often (and it is a core word) so that is the word I chose to represent the rime "ore". For "eat" I just went with eat lol!
I print out the words and then paste them onto colored paper. The colors do not match the AAC coloring system. In fact I vary them as much as possible. The point of the colored background is so that students can see the contrast. They are easily able to see "tall" and "short" letters. I also make sure that if I have a word that starts with an I and the previous word on the word wall under I is green, I will not use a green background.
The words are introduced and then we spend time putting them on the word wall. We talk about the first letter. Where it should go on the word wall. We talk about the background color and how we can see the tall, short and letters in the basement. We talk about how we know other words that sound the same (rimes).
Word Sorts: We do this once a week. Students use our weekly "rimes" to make new words. We start with Visual sorts. I show students the 2 words from our word wall. We read them, talk about them and say them out loud. I then put them in 2 different columns. I then give students post it notes with new words that use our rimes. Students then sort the words into the 2 columns by looking at the words (visual sort). Here is an example:
After the visual sort we move onto auditory sorts. I take all of the post it notes and start the 2 columns again. This time instead of giving the student the post it notes I read them and ask the students where we should put them (auditory sort).
Last we do a spelling sort. This includes the auditory component but takes it one step further. I tell students to use the words we already know (not and same in this case) and make the new words they hear. I usually give each student their own dry erase board, or they just write on our table. If kids are stuck remind them to use the words they already know. Keep referencing those words and where they are on the word wall.
Compare and Contrast: This is a great activity because it makes students really think. They have to use our big tool, the word wall, and make new words. This is so much fun because it shows that kids that our little word wall is full of so many possibilities.
I pick 4 words from the word wall and put them at the top of the board. I then write out sentences leaving one word out. The words that are missing can be filled in by using one of our given words as support. For example, in the first sentence I would say "I want to play the ....." "I wonder what could go there, I am going to read our words, think, same, not, make" "Hmm..I want to play the "Oh Game!". I am going to use the word same to help me spell the word game." This activity allows kids to see that they can spell words on their own. They don't need an adult to help them with every word. This activity allows students access to our word wall and shows them how to use this tool.
Spelling: For this activity I pick a few letters, usually only one vowel, and challenge students to make as many words as they can.
I give them hints along the way. Looking at the above picture on the right I would say something like this. I am thinking of a word that only has 1 letter. It may start this sentence ___ like cookies. (They write it down. Can you add a letter after the letter I to make a new word? Can you change that letter again to make another? Again? Can you add a letter to the beginning to make the 2 letter word a 3 letter word? Can you change the first letter again? Try changing the last letter. Do you think you can make any more words?
Independent Writing: This is done everyday. I have the students start by picking a way they would like to write. These are the options I have in my classroom but you could add whatever you would like. These are velcro'd to the wall.

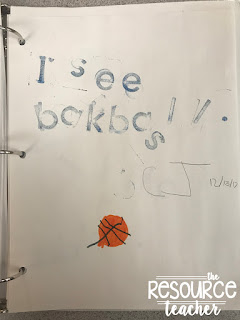
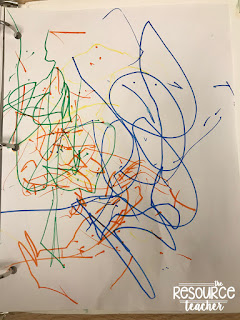
Once kids select how they are going to write they must select a topic. This is very difficult for my students so I try and give them some ideas (things they may have done over the weekend, what we are reading about, their family/friends etc.). When the topic is selected I let them go. It is very easy to jump in and help the students but this is all about independent writing. Have them produce the writing they want and then go back and help them if needed. Do not correct and fix every move they make. If you struggle with this (it's ok to admit this) go work with your emergent students at this time. Here are some examples of my students work. After they finish with their piece they hole punch it, add their name/date and put it in their binder. I add the most recent work on top.
Stamps:
Scribe: The student found these words on their communication device. Instead of the message erasing the para wrote them down on paper. She also made a note on the back to let me know how the student came up with these words.
Keyboard/Typing: If you can't tell this says "Purple jeep beep beep." This is 100% student work. Sure things are spelled incorrectly and there isn't punctuation but this is 100% this students work. It is 100% their own and shows exactly what this student is able to do.
Markers: While it may be hard for you to see this is a writing piece about a shark. I know this because the student brought a shark book to their writing station. They grabbed a blue marker and said swim. Grabbed the orange marker and said eat. etc. I added notes to the back of this to reference.
So, I hope you were able to add a few more activities to your mix. If you have any questions about Emergent or Conventional literacy I would love to chat. Feel free to leave a comment or email me.
 Follow my blog with Bloglovin
 Follow my blog with Bloglovin


