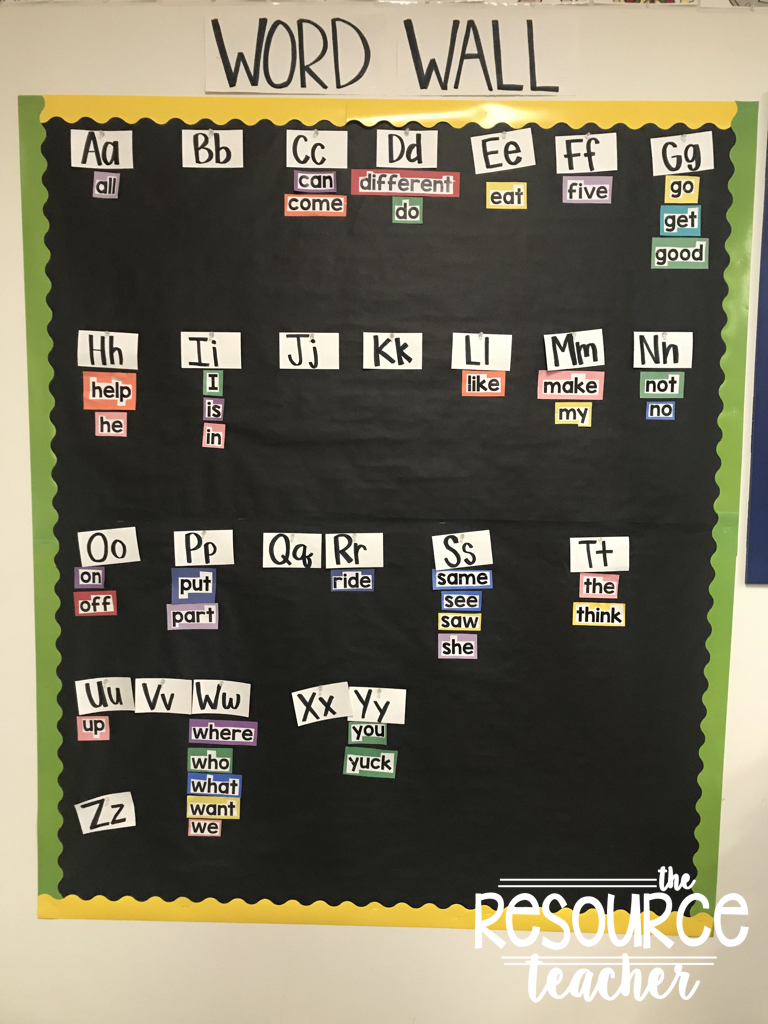
Showing posts with label writing. Show all posts

Tuesday, February 6, 2018

Independent Writing Ideas

A few years ago the thought of having to teach writing to students with complex communication needs was overwhelming. I didn't know where to start and every curriculum out there was way too involved to support the basic needs of my students. However, after a few years of researching and testing out different things in my classroom I can now say writing is one of my favorite things to do with students. I see the most progress and it is easily implemented into my day. Keep reading to see how I am able to have all of my students participate in independent writing.


The first thing to know is that all of my students do independent writing every single day. We incorporate our writing routine into our emergent and conventional literacy blocks. You can read about those here and here.  The students in my class all have complex communication needs and use some form of AAC.


Word Wall
The word wall is a vital part of our independent writing routine. Students need to have access to an abundance of words. They need to be able to have a spot that they can look at to help them build sentences. Remember, the main focus here is that this is INDEPENDENT writing. We want to be able to develop skills in students that allow them to put words together to make functional and meaningful phrases. Also, keep in mind that your word wall doesn't have to be pretty. Kids don't care what it looks like. As long as they know it is a tool they can use make something that you are able to keep up with. This is what our word wall looks like. I took notecards to make the alphabet letters, attached them to the wall with push pins, print out our weekly focus words and glue them to construction paper (the colors have no significance, I just try and have different colors to show contrast) and then staple them to the wall. I use zero laminate and didn't use a ruler to put up and measure out where my letters would be. Oh and how about that title at the top. Yep, just computer paper and Sharpie :).


Topics
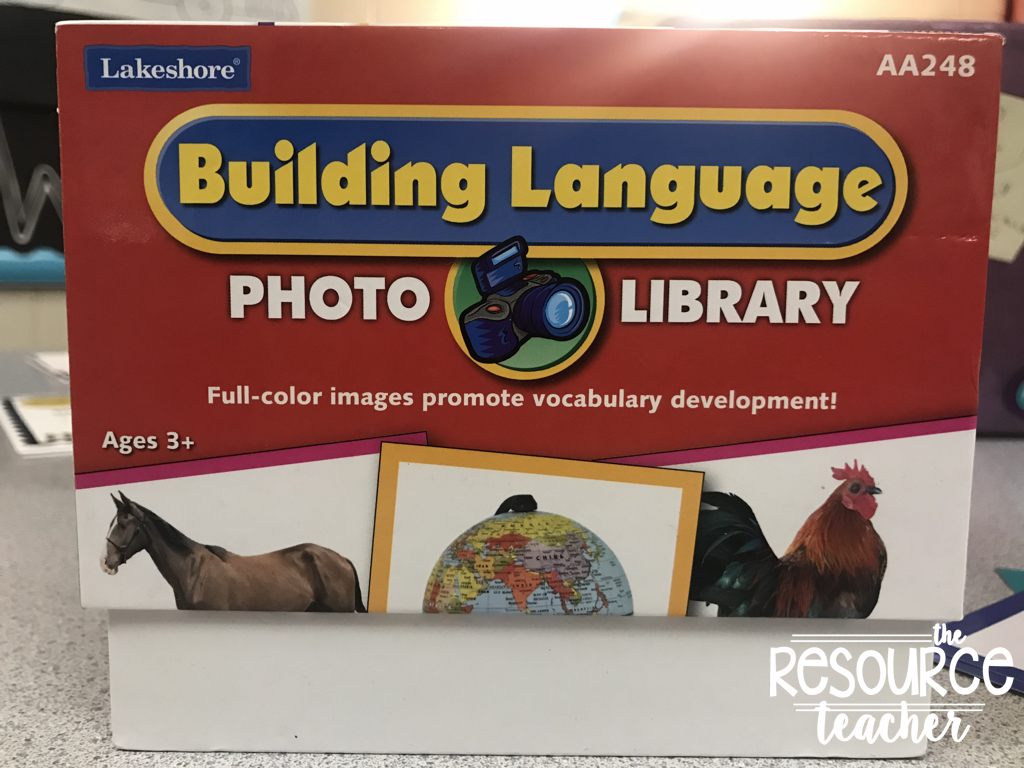
Encourage your students to come up with topics on their own. Remind them of their interests. Maybe make a chart of things for them to reference. I do this until my students sentences start to become repetitive. Meaning, I have students writing the same thing every day, I see mom. I like dad. Once we reach this point I assist students by giving them access to picture cards. **Reminder: I do this for ALL of my students. Even the ones who are not using a pencil independently. You could even keep a working anchor chart in the classroom and add new activities and exciting events you do throughout the month/year. This would be a great thing for students to pull ideas from. The big part about this is remembering that this is independent writing. So while we should be teaching students to write about a variety of topics we should not be telling them what to write. I simply state "What would you like to write about today?" I they say the same thing they always do I will say "I like that idea but you wrote about that yesterday, do you have anything else you would like to share?" If they say yes go with it, if they don't you could say "Here are some things that I like to write about, maybe you could pick something from my collection and write about it too." This still allows students to be selective with their topics but offers them support if needed. Here are the picture cards I use. I grabbed them from Lakeshore Learning.


Ways to Write
Another fun thing we incorporate are different ways to write. I have choices in the front of my room for students to pick from everyday. At the beginning of the year the students loved choosing different ones. I can say now they have all picked their favorite way and do it everyday. You could add more ideas but this is what I have in my classroom.


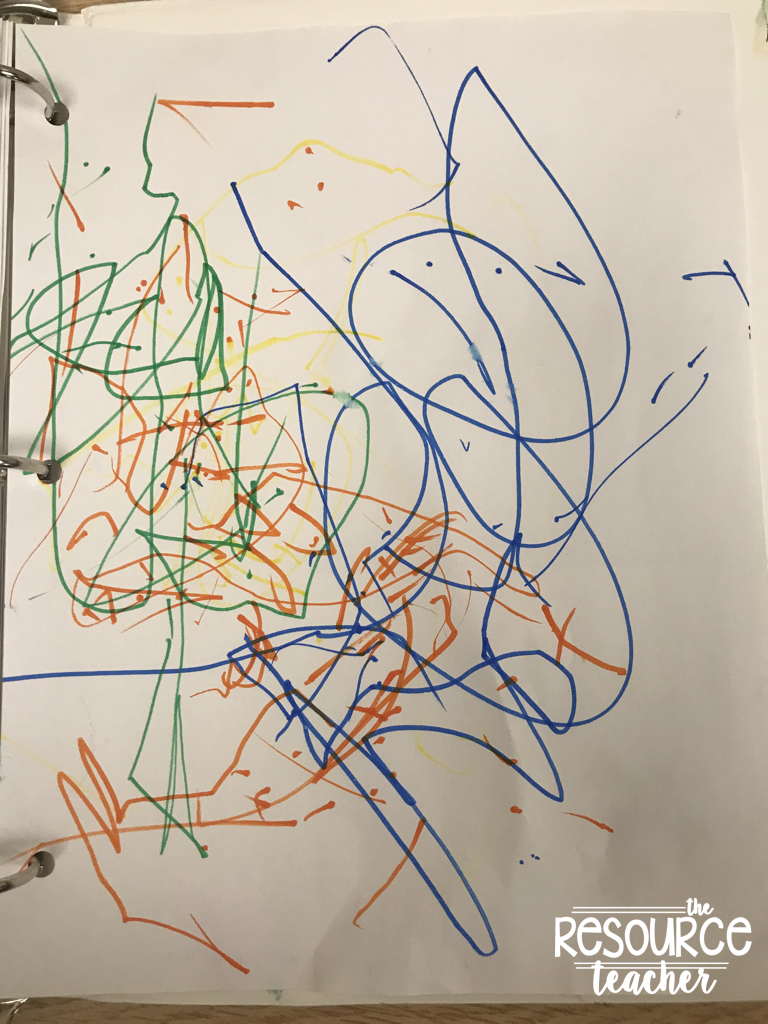
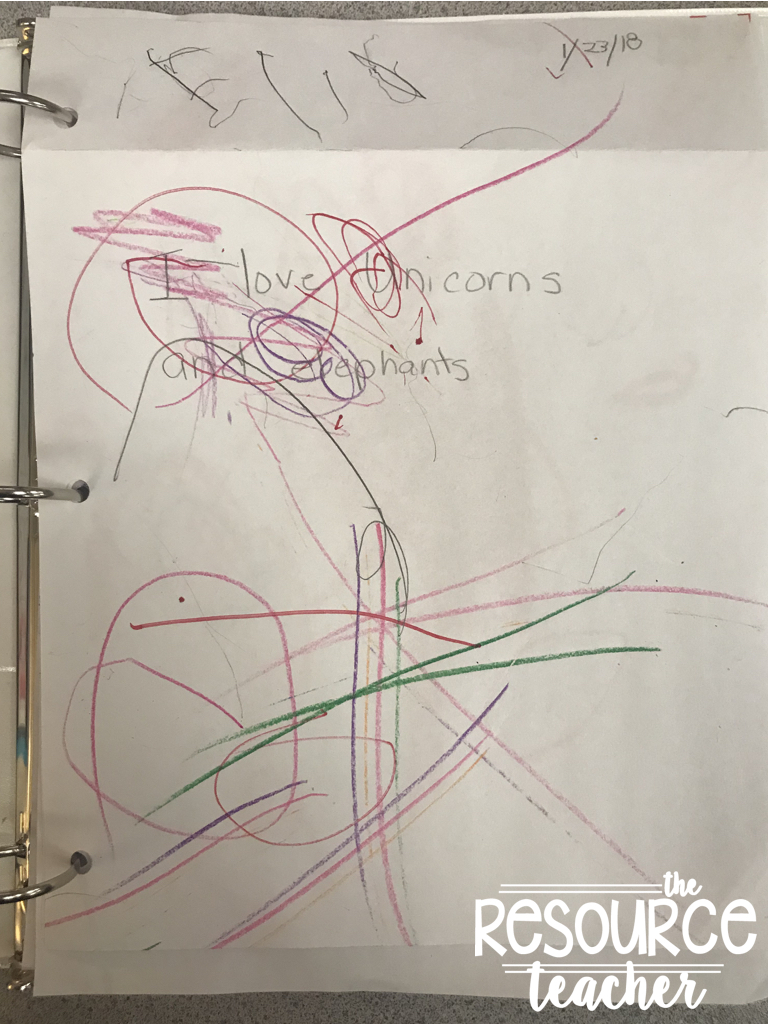
What Does It Look Like?
Some of these pieces were created with pencil, some are scribed (letters/words/phrases given in Proloquo, some are typed and some are a combination of both. I also encourage students to pair a drawing with their writing but it is not a requirement.


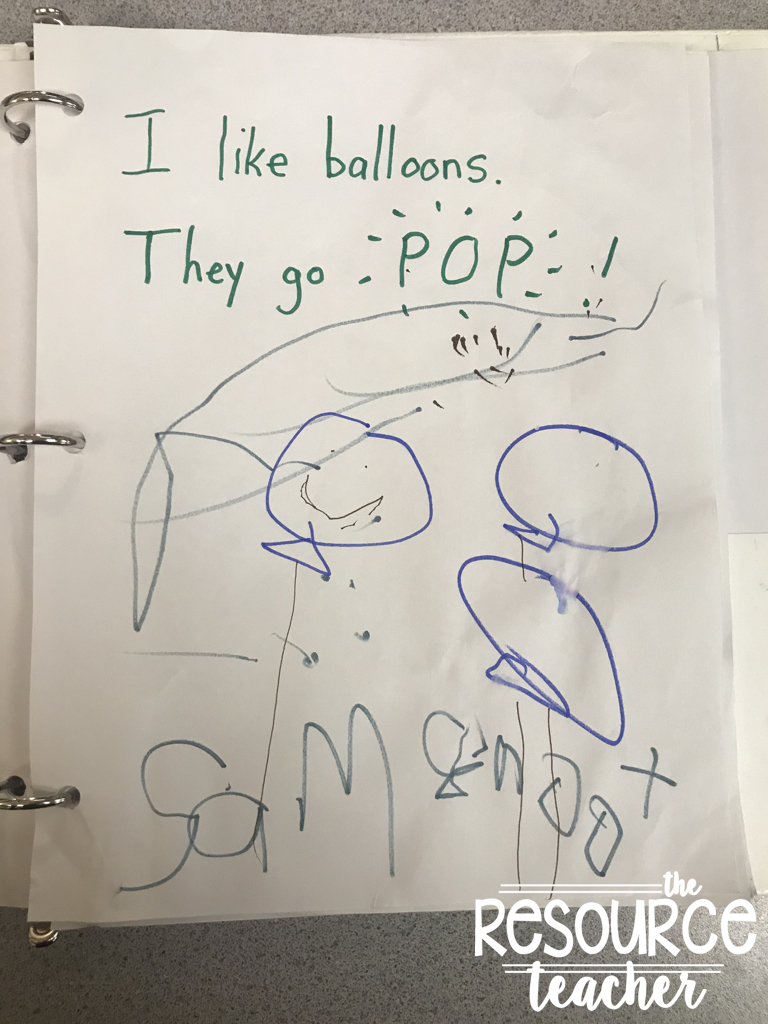
Keeping It Altogether
I give each of my students a writing notebook. They put their new piece of writing on the top each day. This allows them to see their progression and review previous writings they have done. The kids love looking back and rereading things. I take everything out and send it home at the marking period. Make sure to save a few to a digital portfolio or in a file so you can share at conferences or IEP time.


The Share
Every Friday I have the students select a piece of writing to share. They can pick any piece in their binder as long as they have not shared it before. I create a fun sharing space in the front of the room to make it special. The rest of the students sit in the audience and practice their listening skills. The kids come up one by one to share their piece. If they are able to read it orally they do. If they have a device we work on building the sentence during their sharing time. They are then able to show their picture. At the beginning of the year I have the adults make comments and/or ask questions about the writing piece (I may have to help the student respond). In the middle of the year I challenge the students not presenting to make a comment or ask a question about the writing piece. Then at the end we of course celebrate by clapping....but we have added excitement because each student has a hand clapper. I also record each individual share out and send it to their SeeSaw portfolio. You can read about how to use SeeSaw here.


I hope I was able to give you some ideas to include independent writing in your classroom. We devote 30 minutes to this each day. If you have any questions please leave a comment :). Good luck introducing this into your classroom.


post signature Follow my blog with Bloglovin

Monday, December 4, 2017

Conventional Literacy

If you have read about my emergent literacy approach and you are wondering what to do with students who are more conventional readers and writers keep reading to see how I implement it in my classroom.


I have to be honest, I actually have both emergent and conventional readers in my groups so my conventional readers still do some emergent stuff (they love it), which is okay! All of my students have complex communication needs and are learning to use AAC and Core Vocabulary. With this I am able to differentiate and model a ton during my lessons.

Reading
During reading instruction I use Unique Learning System (ULS) and pull some of my favorite highly engaging read alouds from my shelf. In my classroom I choose to use the same story M-F but you could change your story multiple times per week if you had the time. As mentioned before, reading instruction is a great time to model core vocabulary and AAC. When working with my conventional readers I follow the Anchor, Read, Apply model.

Before Reading: This is our ANCHOR activity. This is where I get the kids thinking about the topic/or strategy we are working on. For example, if I want the students to be able to sequence the events in a story we will do a simple sequencing activity. I would pull activities (maybe 3-4) from their daily schedule and have them put them in order. During this time I am making sure to use the vocabulary I am wanting them to learn. In this case it would be "sequence". So I would say "I like the way you are sequencing the things you do during the day" "I see that you have breakfast first, reading second and recess third" etc. This is a quick activity so I spend about 10-15 minutes on this. (My emergent students are working on self selected reading during this time).

During Reading: This is the READ part of the model. I have all of my students and we get cozy in our group reading area. All of the students have access to high and low tech AAC. I begin reading the story. Making sure to introduce it and spend time talking about the author, illustrator and making comments about the title/cover. I will also try to have the kids infer if appropriate. I use the CORE board during reading instruction and model using the the C.A.R method.

Keeping the conventional literacy students in mind I will be sure to reference our anchor activity new vocabulary. So again if we were working on sequencing and we were reading a story about giving a dog a bath I would say "First we find the dirty dog", "Next we...." etc.

After Reading: This is when we APPLY what we have learned. I will generally use the same activity from the Anchor but change the content to match our story. So if we were going to sequence how to clean a dog I would be sure to print out pictures and have the students sequence them. 

Due to the nature of my classroom it usually takes me 3-4 days to complete all of these activities.

Writing
During writing instruction we are working on a lot of different skills. We do small group and individually writing. This is where my conventional students still do the predictable chart, cut up sentences......and making the book as my emergent students do. They just get additional writing throughout the week. 

Word Wall: I introduce new words to add to our word wall weekly. At this time we are working on adding 5 new words a week. When selecting these words I pick 3 core words and then 2 words with common rimes (in this picture I chose 2 core words and 1 color word...there can be exceptions :)). When selecting the rimes I use this chart. 
Instead of teaching the rime I add an onset and make that the word the students use (you will see how the rime comes into play later). So in the instance of the words below I chose the rime "ore" and "eat". I use the word more often (and it is a core word) so that is the word I chose to represent the rime "ore". For "eat" I just went with eat lol!
I print out the words and then paste them onto colored paper. The colors do not match the AAC coloring system. In fact I vary them as much as possible. The point of the colored background is so that students can see the contrast. They are easily able to see "tall" and "short" letters. I also make sure that if I have a word that starts with an I and the previous word on the word wall under I is green, I will not use a green background. 
The words are introduced and then we spend time putting them on the word wall. We talk about the first letter. Where it should go on the word wall. We talk about the background color and how we can see the tall, short and letters in the basement. We talk about how we know other words that sound the same (rimes). 

Word Sorts: We do this once a week. Students use our weekly "rimes" to make new words. We start with Visual sorts. I show students the 2 words from our word wall. We read them, talk about them and say them out loud. I then put them in 2 different columns. I then give students post it notes with new words that use our rimes. Students then sort the words into the 2 columns by looking at the words (visual sort). Here is an example:
After the visual sort we move onto auditory sorts. I take all of the post it notes and start the 2 columns again. This time instead of giving the student the post it notes I read them and ask the students where we should put them (auditory sort).

Last we do a spelling sort. This includes the auditory component but takes it one step further. I tell students to use the words we already know (not and same in this case) and make the new words they hear. I usually give each student their own dry erase board, or they just write on our table. If kids are stuck remind them to use the words they already know. Keep referencing those words and where they are on the word wall.


Compare and Contrast: This is a great activity because it makes students really think. They have to use our big tool, the word wall, and make new words. This is so much fun because it shows that kids that our little word wall is full of so many possibilities. 
I pick 4 words from the word wall and put them at the top of the board. I then write out sentences leaving one word out. The words that are missing can be filled in by using one of our given words as support. For example, in the first sentence I would say "I want to play the ....." "I wonder what could go there, I am going to read our words, think, same, not, make" "Hmm..I want to play the "Oh Game!". I am going to use the word same to help me spell the word game." This activity allows kids to see that they can spell words on their own. They don't need an adult to help them with every word. This activity allows students access to our word wall and shows them how to use this tool.

Spelling: For this activity I pick a few letters, usually only one vowel, and challenge students to make as many words as they can. 
I give them hints along the way. Looking at the above picture on the right I would say something like this. I am thinking of a word that only has 1 letter. It may start this sentence ___ like cookies. (They write it down. Can you add a letter after the letter I to make a new word? Can you change that letter again to make another? Again? Can you add a letter to the beginning to make the 2 letter word a 3 letter word? Can you change the first letter again? Try changing the last letter. Do you think you can make any more words?

Independent Writing: This is done everyday. I have the students start by picking a way they would like to write. These are the options I have in my classroom but you could add whatever you would like. These are velcro'd to the wall.

Once kids select how they are going to write they must select a topic. This is very difficult for my students so I try and give them some ideas (things they may have done over the weekend, what we are reading about, their family/friends etc.). When the topic is selected I let them go. It is very easy to jump in and help the students but this is all about independent writing. Have them produce the writing they want and then go back and help them if needed. Do not correct and fix every move they make. If you struggle with this (it's ok to admit this) go work with your emergent students at this time. Here are some examples of my students work. After they finish with their piece they hole punch it, add their name/date and put it in their binder. I add the most recent work on top.

Stamps:


Scribe: The student found these words on their communication device. Instead of the message erasing the para wrote them down on paper. She also made a note on the back to let me know how the student came up with these words.
Keyboard/Typing: If you can't tell this says "Purple jeep beep beep." This is 100% student work. Sure things are spelled incorrectly and there isn't punctuation but this is 100% this students work. It is 100% their own and shows exactly what this student is able to do. 
 Markers: While it may be hard for you to see this is a writing piece about a shark. I know this because the student brought a shark book to their writing station. They grabbed a blue marker and said swim. Grabbed the orange marker and said eat. etc. I added notes to the back of this to reference.

So, I hope you were able to add a few more activities to your mix. If you have any questions about Emergent or Conventional literacy I would love to chat. Feel free to leave a comment or email me.


post signature Follow my blog with Bloglovin

Sunday, February 19, 2017

Alternative Pencil

Writing can often be over looked in classrooms of students with significant disabilities. It's no fault to you or your staff, there are just so many things to focus on; behaviors, speech, following directions, toileting, eating etc. If you had to give up something, I am sure writing would be the #1 thing as it may not seem like a very functional thing for our students, especially those who struggle to hold standard pencils. That is... until you introduce an alternative pencil.


I started using alternative pencils when I went to a conference last year on emergent literacy, read more about that here. It honestly changed the way I taught. Usually you go to conferences, they get you super excited about the new teaching method, you come back, implement it into your classroom and a month later you give up on it or find something else. Well folks, I have to say, I have never gone back to the way I didn't teach 😁  taught writing!

Alternative pencils allow our non-verbal students a way to express themselves through text. It is engaging for both the students and teacher. I love seeing my students sort through the letters to spell out their message.

Here is what my alternative pencils look like.


How do they work? You can project the pencil or just print and hold it.
1) Make sure you have something to write responses on (whiteboard, typing, paper)
2) Then determine how your student is going to respond (yes/no). Are they going to shake their head,     use a switch etc
3) Start by asking your student "do you have something to say/are you ready to write etc."
4) Put your finger on A, say "is it ABCDE" and point to each letter.
5) Student responds
6) If they say yes then go through each letter slowly until they tell you their letter. If they say no go to     the next column and repeat. If they say yes acknowledge it and record their answer.
7) Repeat but this time say "do you have another letter"....then go through the process again.

Here is a video to better explain this process. I did not make or own this video.

Now you might be saying "this is great, but my students don't know how to write. They don't know their letters, they can't spell". While this may be true, do we truly know how much they do and don't know if they haven't ever had a way to express themselves? It's something to think about right?

A huge part of this process, especially for students who are new to this, is interpreting what they are trying to say. Here is an example of something a student wrote in my class.


When seeing the letter QFT what comes to mind? quick, quarter, quiet, fight, Friday, fries, go, goal etc. Think about your students interests or common things they like to watch, say etc. When I was doing this with my student I said to him...did you mean quick field goal (they played soccer in P.E.), he didn't have much of a response. Then I got really excited and said did you mean......Cute Girls??? He instantly lit up, started smiling, clapping and shaking his head yes!!! Clearly this is what he was thinking about (maybe not but he was excited about it!!). So this is what I did. Write down what they were actually trying to say then use the alternative pencil to model how you would have spelled the word(s).

I will be the first one to admit, this is hard. The kids will struggle. It's all new. But think about when you give any child a pencil for the first time, what's the first thing they do? Scribble....So take the plunge, download this alternative pencil and get your kids scribbling!!!!

Saturday, September 24, 2016

Structured Motor/Sensory Room Activities

Do you have access to a motor room at your school but don't know how to utilize it? Are you looking for some new ideas? Do you wish you had a routine that was easy to teach for your students and/or your paras? Keep reading to see how we manage motor room time at our school.
We start out by having each student grab their motor room visual. This allows our kids the opportunity to be "independent" in the motor room. It is also a great mini-schedule for your students who need to know exactly what is going to be done in the motor room. The kids also have access to dry erase marker to cross off the activities once they have completed them. Each group of my students spends 30 minutes of structured time in the motor room a day. 

(5 minutes) Each week our OT (occupational therapist) selects one of our gross motor activity visuals and posts it under the gross motor sign. The visual shows a picture of the object the kids will be using and a description on how to use it. Our students are not allowed to visit our motor room alone, so there is always an adult there to read it, check for understanding and possibly show the students what to do if they don't understand.


Here are the gross motor activities we have prepared for the students this year:
Yoga Ball: 
-Sit on the ball with or without support.  Bounce.
-Sit on the ball with or without support.  Lean side to side, front to back and try to keep balance.

-Sit on the ball with or without support.  Try to reach for different items on the floor and toss into a bin.
-Sit on the ball with or without support.  March legs up and down.  Tap opposite hand on knee when it is raised.
-Sit on ball with or without support. Play catch.
-Roll on belly on ball with arms extended to floor.  Walk hands forward and back trying to keep balance.  May need support.  Roll back to knees.
-Keep balance on ball on belly with arms extended on the floor.  Try to pick up items to put in a bin.
-Dribble ball.  2 hands, one hand, dribble in a pattern
-Play catch with the ball rolling or bouncing it between people

Swing:
-Scatter things around swing and have child move the swing on belly to retrieve or look for certain items and throw or place in bin.
-Try to swing back and forth, side to side, diagonally

Hoops
-Stand and try to rotate around hips (standard hula hooping)
-Hold hoop on side and have kids crawl through (bear or crab)
-Use hoop like a jump rope and rotate around head and step through.
-Place on floor and hop in each hoop.  Use 2 feet together or one foot.

Medicine Ball
-Hold ball and move in a circle close to body (both directions)
-Pick up ball and throw to ground

Scooters
-Move on belly or seated around the room.  Go to called out items to pick up.

Tramp
-Jump on 2 feet (with or without support)
-Jump on 1 foot and then the other.
-Jump with a pattern, (2 left jumps, then 2 right jumps)  
-Clap hands while jumping.
-March on tramp (high knees)
-March on tramp and touch opposite knee with each hand (crossover march)

Ribbon Sticks
-Make letters, words, names, numbers in the air (use both hands)  

Tissues/Scarves
-Pick up scarves off the ground and toss into air
-Pick up scarves and when they are floating down catch them on a called out body part. (Left elbow, right knee, right shoulder, left toe, head etc)

Balance Board (2 sizes, lower one is easier)
-Stand on board to balance (with or without support)
-Stand on board (with or without support) and rock side to side and balance.
-Play catch while standing on board

Parachute
-Have kids hold parachute and lift and lower sitting or standing
-Put a ball on parachute and try to keep it on
-While lifting and lowering parachute as a group, have kids take turns going under it.

Half Ball balance game
-Set out half balls and have kids try to stand on them one one foot or two with or without support
-Make a line of half balls and have kids walk over them with or without support

Moon Shoes
-Put on moon shoes and walk around, with or without support.
-Put on moon shoes and bounce in place, with or without support.

Animal Walks
-Have kids try to walk like different animals (bear, elephant with arms clasped like a trunk, crab, snake, etc)  Can go on mats all the way around swing.  Can try to go backwards.

Obstacle Courses
-Line up a few activities for kids to go through. Ex: jump on tramp 10 times, walk like a bear, climb through hoop, do the “try this” activity, 10 jumping jacks, then walk over half balls, repeat...

(5 minutes) Now that the kids have warmed up their bodies it's time to have them warm up their hands. Just like the gross motor station, we have a weekly visual for our fine motor activities too. 
Here are some of the fine motor activities we have prepared for our students:

Tweezers/tongs with puff balls

-Use tweezers to pick up pom pons and place in a bucket
-Use the twisty dropper to suck up and squeeze out water
-Use the twisty dropper and have a "puff ball race". Squeeze the dropper to have it blow air

Nuts and bolts
-Screw the nuts on and off the bolts
-Match the colors of the nuts and bolts before putting them together

Clothespins
-Squeeze the clothespin to open and close it 10 times
-Pick up items with the clothespin and transfer them to a new place

Rubber bands
-Group spoons together and wrap a rubber band around them.
-Use rubber band to make shapes on the Geoboard
Paperclips
-Collate notecardsand secure with a paperclip
-Open paperclip box, dump out paperclips, put them back in the box and close it

Play-doh
-Smash it like a pancake
-Roll it like a snake
-Spell your name by rolling out the letters

Legos
-Build a tower
-Make uppercase and lowercase letters. (Check these visuals out for FREE)

Cards
-Deal the cards
-Flip the cards
-Hold 5 cards in your hand and spread them out so you can see them (like you're playing)

Stacking coins
-Stack coins to make a tower

Dominoes
-Line them up
-Stack them

Stringing Beads
-String them to make a necklace
-Pick them up with: tweezers or clothespins

Paper
-Tear it
-Hole punch it

Wikki-Stix
-Make letters, numbers, shapes

(15 minutes) Now that their bodies and hands are warmed up they are ready to work. This is where the students will complete those fine motor goal work activities. We have created folders for the students that have papers to match their goals.


Here are somethings the students work on:
-Writing their name
-Writing the alphabet (upper and lowercase)
-Copying sentences
-Cutting (lines, shapes)
-Tracing
-We even have some students complete their writing assignments from their general education teachers.
(5 minutes) Now come on, after all that work your kids deserve to have some time to do what they choose to do. We have so many fun gadgets in our motor room that we don't utilize during our other activities and this is when the kids can choose to use them. Now, some kids do choose to pick gross/fine motor activities that we did from previous weeks....of course we allow this. 


Here are some choice time activities we have:
-Hide in the tent
-Play in the ball pit
-Crawl through the tunnel
-Play in the body sock
-Turn off the lights and plug in the disco ball
-Blow bubbles 
-Jump from the trampoline on to the crash mat
-Color
Before the kids leave they are expected to clean up the room and make sure it is set up for the next group. They also clean off their schedule cards and put them in the basket.

Grab the visuals here!

I hope I was able to give you some new ideas. What fun activities do you do in your motor room? Do you structure your motor room or is it a free for all?


post signature Follow my blog with Bloglovin