Monday, August 8, 2016

Functional Calendar Routine

Calendar skills are something that are super important. Students (of all ages) need to be able to look at and understand a calendar. There are also so many skills you can tie into a daily calendar routine. In the past I always printed cute theme calendar pieces that I laminated, Velcroed and stored in a cute little container by the board. Don't get me wrong, there is absolutely nothing wrong with doing this. However, I don't have time for that. It was so much prep work. And then.....something comes up and you don't have a piece you need AHHHH!!!! My friends, no worries. I have the answer, introduce this Functional Calendar Routine into your day.


This idea was one that came to me at 3:00 in the morning and I had to roll over and add it into my Amazon account before falling back asleep. In most of our special education classes we are teaching functional/life skills. So....why not get the kids using a REAL calendar? Since this idea just came to me and I haven't started school (heck I haven't even been allowed in my classroom) I don't have it set up and these pictures have totally made up activities on them but I wanted you to be able to see what the heck I am talking about.


Here it is......a standard (well school year) desk calendar. You can purchase any calendar but I liked this one because it has holes in the binding. That way I can hang it on Command hooks. I also liked that it has large day boxes and a section for notes.


Using this desk calendar allows me to do WHATEVER I want. If I want to work on patterns I can, if I want to add special days I can, if I want to show my students when school and non-school days are I can. Best of all, after I think I have the month complete and I get the news that "Mrs. Smith's" class is going on a field trip to the Dairy Queen I don't have to run to the computer, print off a picture, laminate it, velcro it and get it on the calendar. All I have to do is WRITE IT!!!! Actually I am going to have my kids write it. I am going to get them used to handling a real calendar just like I do everyday.

Here are a few things you could do:

Patterns- Since you are able to do whatever you want and you don't have to worry about prep work do whatever your kids need. Make the patterns easy or complicated. You could have monthly theme patterns like I have shown. You could do a color pattern (just draw colored dots), community signs, school supplies, core words, spelling words....honestly it's endless!!

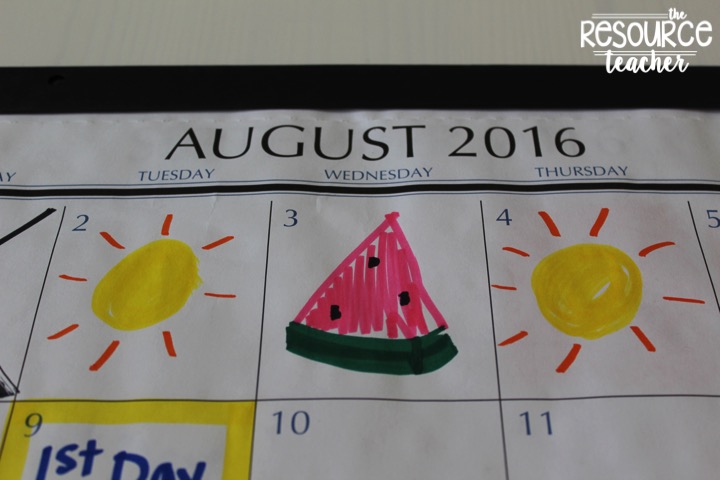

Special Days- color in the box, outline the box, write inside the box, use the notes section and color code it. I am really excited about this because my students are assigned to a general education class as well as my class. There are so many different activities going on, it gets overwhelming having to make cute pieces to go along with everything. I know, I know I could just throw something up on my cute calendar but....my students I won't have it. I can't deal with things not all matching. I think I am going to utilize the system I have below. I will write in the box when it has something to do with my class and then color code the boxes when it has to do with a gen. ed class. For example...students in "Mrs. Smith's" class will know their color is blue. So when something is outlined in blue they will know it is their day. Then I will write what the activity is in the notes section.


Weekends- Color weekends/no school days red. This was students can visually see when they don't have school. My students really struggle with the concept of school/no school days. This will be an added visual support for them.


Review Months- since the month before and after are listed on the calendar its a good way to practice/review.


Something else that is cool is when the month is over you can rip it off and hang it up like an anchor chart or take a picture, print it and store in a binder or have for student scrapbooks. That way you and your students can look back and see all of the things they did throughout the year.


Is this something you will be adding to your classroom? Do you have another use for this functional calendar routine?

To save this post for later pin the image below.
post signature Follow my blog with Bloglovin

Friday, August 5, 2016

Save Money by Double Siding Laminate Sheets!!

If you are anything like me you spend over half of your budget on Velcro and laminate. I had to find a way to save both and then it hit me. Why don't I just laminate 2 sheets back to back?


There are so many things that I laminate that don't require cutting. These would be the resources I would double side laminate. Here is how you do it.

1. Print everything you are wanting to laminate.


2. Find the items that go together and do not need to be cut.


3. Put them in the order you want.
4. Flip every other page so that the pages are back to back.
5. Slip 2 pages into a laminating pouch.

  -If you are really anal like me double check to make sure they are straight)

6. Put through the laminator.


7. Enjoy!!!

I usually hole punch and store in a binder or don't hole punch and store in a file folder. You can also add velcro to the pages. Just store the pieces in a Ziploc baggie and attach it to the page.

Now.....do any of you know of a way to save Velcro? That is my next mission :)

post signature Follow my blog with Bloglovin

Friday, July 29, 2016

Back-2-School Giveaway

Even though I have well over a month before I go back to school (we start September 6th!) I know some of you are going back soon. I wanted to do a little giveaway to hopefully help inspire you for the upcoming school year.


Included in the giveaway are 4 of my newest products. I am so excited about these and cannot wait to use them in my classroom.


Get a closer look at this pack here. This bundle is jam packed with leveled reading passages and "WH" comprehension questions. These are perfect for any part of the day; whole group, small group, independent practice, para professional led station, homework and more!


Get a closer look of this bundle here. Daily Questions and Journal Responses is a YEAR LONG, leveled writing pack. Yes you heard me....writing for the entire year!


Get a closer look here. This math pack is jammed packed with basic math skill worksheets. They focus on counting (including skip counting), money, adding, subtracting, time and tallies. This pack also includes a data sheet and 20 assessments!


Check this resource out here. Sight words are a very important part of the special education and early elementary curriculum. Finding ways to assess the words quickly was always something I struggled with. This pack is perfect for assessing students quick using the digital word displays I have set up.


Lastly, if selected you will receive a $10 credit to purchase anything else in my store! Check it out here.

While you are not required to consider following me when visiting the required entry sites. If you follow me you will get updates on when I post products, sales, FREEBIES and more! Good Luck with your Back-2-School "shopping and classroom set up!".

a Rafflecopter giveaway

post signature Follow my blog with Bloglovin


Monday, July 18, 2016

Centers for an Upper Elementary SPED Classroom

Due to the nature of our classrooms we are bound to have a wide range of student abilities. Having such a wide range can sometimes be challenging when it comes to planning lessons, centers and activities. Not only is the wide range a challenge but, most of our students are also no where near grade level. While most of my students are at a preschool-1st grade level, I teach 4th and 5th grade.

Let's face it, no matter what their cognitive level is, it is important to have age appropriate tasks. The big thing for my classroom is INDEPENDENCE, INDEPENDENCE, INDEPENDENCE!! If students do not leave my classroom being independent in all aspects of the school day I have not done my job. They do still need a lot of help academically but...they are able to move from center to center, get out the needed materials and get started on the task.


The big thing I do that makes it more age appropriate is how students get from center to center. Instead of a giant center rotation chart I created these individual rotation charts. I have students that come in at different times. That is why you see the cards starting at different numbers.


Here are a few center activities I do in my classroom. These activities focus on the basic/primary skills my students need but have been adapted to fit my upper elementary classroom. I apologize for the lack of pictures :(.

READING
-Independent reading with individual self selected book boxes
-Technology Reading (Raz-Kids, Lexia)


WRITING
- Sentence fill ins
-Typing
-Daily Leveled Work
-Writing using Expanding Expression Tool Companion
-Daily writing journal (this is not complete....coming soon :))


MATH
-For this center I don't really have activities. What I have the students do is a worksheet that goes along with the lesson I taught that day.

IEP Tubs
-These hold activities that match students individual IEP goals and objectives. I print off a snap shot of their goals and a data sheet to make it easy. I change them out as needed.


What centers do you do?

Thursday, July 7, 2016

Para Led Centers

Do you ever find yourself running around like a chicken with your head cut off? Constantly checking off items on your to-do list but never seeming to find the end? Well my friends, it's time to stop! Being a special education teacher means we wear a lot of hats. So many hats that we sometimes need to give up some of the duties. Yes, yes I said it....give up some of our duties.

Most of us have the privilege of having para professionals in our classroom. Yes they are there to support the students first and foremost but...they are also there to help you. Structure your classroom in a way that allows them to take some of the work load off of you while still spending time with the students. Incorporate para led centers into your daily routines.


I am a type A personality all of the way. When I first started teaching I found myself micro managing everything. Until one day I just couldn't do it anymore. I said to myself, "Am I really the only person who can listen to the students read?" "Am I the only one who can put a "plus or minus" sign next to the students' goals?". The answer is NO!!!!

Para professionals are amazing resources to have in our classrooms. So use them!!! Here is how I figure out how to incorporate para led centers into my classroom.

1) I first come up with everything I need to do with students during the day. (Reading, Math, Writing,
Independent Work, Fine Motor Tasks, Group Time, Calendar, etc,)
2) I then put the tasks into 2 categories....1) Independent Work 2) Teacher Led
3) I then take a closer look at all of the items I have in the teacher led category and split those into 2 categories... 1) things I MUST teach  2) things I can give up some control of :)
4) All of the items in the "things I can give up column" are going to be the centers/tasks that my paras run.

The centers that paras run are going to be different for every teacher. There are certain things some of us are willing to give up some control over while some of us will never ever no matter what let anyone else touch. You know what...that's okay! That's the beauty of centers, teach what you want/love and have the rest of the materials/activities at other centers.

I try to make it easy for everyone. Most of our para professionals do not have teaching degrees so they may need some guidance. Just like we make things predictable for our students I make the centers predictable for my staff. I have them do the same thing everyday. This allows them to become comfortable with the center and puts my type A personality at ease. For me...I HATE taking data. I just hate it. I love to create forms and analyze it but I HATE to take it. So....I have my paras run centers that I can incorporate easy to use data sheets into. This is a win, win. I don't have to take data and the paras feel like they are contributing a lot to the classroom/students.

I have paras run the following centers; Worksheets (these are completed after I have taught the lesson...students are not yet able to complete these independently), Daily Work, Typing, Fluency, Reading (checking in during independent reading), Independent Work. **During the independent work centers they make sure all of the tasks are ready for the students and then take data :) on them once the students have finished the task.

I don't want you to think I am being sneaky and giving my paras all of the things I don't like to do. I am just spreading out my tasks. I look at it like this, I am teaching the new topics while the paras are helping to maintain the skills. ***I also make sure to check in on my paras to make sure they are not taking on too much. Make sure to have open communication and accept their input!!

What are some centers that you have your paras run? If you don't have paras run centers, how do you utilize them?


post signature Follow my blog with Bloglovin

Wednesday, June 8, 2016

Kahoot!

Are you looking for new and engaging ways to incorporate comprehension and Next Gen. learning into your classroom? Well....then I have the answer for you.


Kahoot! is an interactive online tool that allows you to upload questions on any topic you are wanting to assess your students on. I use it mostly for reading comprehension but you could also use it for a pre-test, review or post test.

You simply go to getkahoot.com and create a free account. You can then start uploading your questions. What I love most about this is you don't have to include 4 answers. You can tailor it to meet your students needs. I typically have 3 choices per question. You can also adjust the amount of time your students have to answer. I do the maximum amount of 120 seconds. Once completed you are ready to start assessing your students.


Your kids will need their own device (computer or iPod/Pad/Phone) and they will visit kahootit.com  and put in the game code that appears on your screen.


Once the students are all in, you will hit start on your main device (computer/SmartBoard). The question will ONLY appear on the main device. You will have a short amount of time to read this, so I usually read the question and choices aloud. The student will then only have the color/shape boxes on their device (no words). They can select their answer. The faster they answer the more "points" they are awarded....if the answer is correct.


The kids will repeat this process until all of the questions are answered.

I love using Kahoot because it is super fun and engaging for the students AND it is not hard to make. The best thing is Kahoot stores all of your assessments on your account. So what does that mean for you? Use this summer to create assessments to use with your kids next year! If you don't have books with you at home consider looking at Storyline Online videos. These are great and you can even use these in your lessons next year!!

Sign up for your free Kahoot! here. If you end up making a fun Kahoot! consider sharing it with me.

post signature Follow my blog with Bloglovin

Friday, May 27, 2016

Expanding Expression Tool (EET)

As the school year is winding down and you are thinking about all of the new things to include in your daily routine next year keep reading!!! The Expanding Expression Tool is an AMAZING resource that has helped my students become not only better writers but better communicators too.


The Expanding Expression Tool or EET is used as a multi-sensory approach to improve oral and written language. Okay...so what does it look like and how does it work? Let's check it out.....

What it looks like?: 


How does it work?:
Each part of the EET serves a purpose. Check out the chart below to see what each color stands for.


How can you use this to improve oral and/or written language?

1st- Select an item
2nd- have a student describe it
3rd- introduce EET
4th- have the student describe the item again and be amazed!!

Example: You show the student penguin. They may say it's an animal that lives in the cold. After introducing EET the student will be able to share a lot more about the penguin. They will be able to tell you.....

       green/group: Animal
       blue/do: swim, walk/waddle, eat, lay eggs
       what does it look like?: black and white
       what is it made of?: comes from an egg
       pink/parts: flippers, bill, feathers, neck, eyes, webbed feet, claws
       white/where: Antarctica, zoo
       what else do you know?: males sit on eggs, mates for life, waddle and swim

As the students get used to this their overall oral and written language will improve tremendously. You can use this tool in a variety of ways including, direct instruction, para led station, writing center, homework and more!!

After my students were comfortable with EET, I set up an EET station in my classroom in lieu of my traditional writing center.


You can even differentiate within EET. You may have some students who are just working on stating 1 word answers, but you can also have students practice responding in full sentences. 

Student 1 Example: Green/Group: animal
Student 2 Example: Green/Group: The penguin belongs to the animal group.

Overall, EET has been an amazing tool for my students and a wonderful additional to my classroom. We use this resource but you can also check out Teachers Pay Teachers for more. Or you can check out the original kit here!

I hope you are able to implement EET into your day next year!!

post signature Follow my blog with Bloglovin