Showing posts with label autism classroom. Show all posts

Sunday, December 13, 2015

Emergent Literacy for Students with Significant Disabilities

This is a long post but it is so worth reading if you are struggling or want to improve the way you teach literacy to your students with significant disabilities. In the short time I have been doing this I can already see the benefits and wish I would have started this sooner.

Teaching reading and writing to our students with significant disabilities can be tricky. You may often think, do they get this? Is this worth my time? How do I get them to interact if they are non verbal?

No worries, I have had these same thoughts until recently. I attended a training at my local ISD and left feeling so inspired.

Before diving into this I want you to know I have 11 students on my caseload. I have 3 students who I use this method with and it takes about 45-60 minutes a day. All 3 students are non verbal. One has a communication device, can spell and will hold a writing utensil for 5 minutes or longer. The other 2 students do not have a communication device, cannot yet identify letters and before starting this literacy approach would not hold a writing utensil independently.

My other students are readers and writers (to some extent) and this literacy approach is not appropriate for them. This was a picture I took at the conference I went to. Sorry the quality is terrible but it is a good way to figure out if your student(s) is an emergent or conventional reader and writer.


Here is how I incorporate literacy into my classroom for my students with significant disabilities.

Start by reading this book.

After reading the book you will see that reading and writing are split into "4 blocks" (Shared Reading, Shared Writing, Independent Reading, Independent Writing). Here is how I incorporate the blocks into my day/week.

Shared Reading: I start each session with a shared reading. It is a great way to get the kids engaged and excited about learning. You can use any book you would like. I use the same book for 1 week. I have access to the Unique Learning System Curriculum which is awesome but not required.


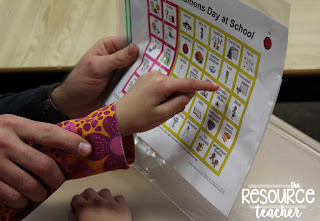
Once you have selected your book it is important to figure out how your students are going to interact with you. If they do not have a communication device you will have to create something to help them engage in the lesson. This is why Unique is awesome....they have a communication board at the end of all of their books :). 

I print a communication board for all of my students (even the ones with communication devices) and place it in front of them. As you can see these are not anything fancy. I don't even laminate them. I simply print them on regular paper and put them inside of a gallon size baggie. 


While reading the pages it is important to remember the acronym "C.A.R." to maximize student engagement. 

The "C" stands for Comment. A comment is something as simple as Ahh! or Wow! or in my case with our book last week Yum!!.

The "A" stands for Ask. Ask your students a question about the page. Such as "Do you put lights on your tree?", or  "What do you put on your tree?"

Then wait......and maybe wait.....and wait some more for their response.

The "R" stand for Respond. This is your opportunity to interact with your students. See what answer they pointed to. Even if the answer is incorrect, the goal is to have the students engaged. So if you ask "Do you put lights on your tree?" and they point to turkey on their communication device, make a joke of it. "You put turkey on your tree? That is funny!".

Then repeat this with every page. Try asking a variety of questions or if you have a student who is working solely on yes/no questions ask them those. This is your chance to get your students engaged.

As I said before I read each story for 1 week. I try to ask the same questions everyday. That way my students become familiar with the answers and can feel successful. The only thing I do differently is review the vocabulary on Monday's and Wednesday's.

Shared Writing: For the shared writing portion you do something different everyday.

-Monday: You have your students "write" their sentences. Make sure to have a common sentence starter. I tie this into the story we are reading so that the students get more familiar with the vocabulary and they can use the same communication device. I make a chart and write who "wrote" each sentence. When writing the sentences it is important to line all of the words/sections up (don't mind my first sentence....it is a little off and bothered me all week!!).


Tuesday: Reread and Work with the sentences. I have a pointer and read each sentence to the students. Make sure to say who wrote each sentence when reading them. Look at the kids and make sure they know you are reading their sentence. I then select something in the sentences we want to focus on. This week we worked on writing the word My.

I start by saying what we are going to work on. All of my students have their own paper and the staff member working with them has the writing utensil. All of my kids use skinny markers at this time. I show the students how to make the letter. I then break it down and we work on it section by section. The students then make the letter using the hand over hand approach EXCEPT....the students hand is over the adults hand. This way the students can feel how you are moving your hand instead of their hands being restricted when your hand is over theirs (try it....you will see what I mean :)).


Wednesday: Cut up sentences. Write the students sentence on a sentence strip. If you have students who are working on typing they can type their sentence and then use that to cut.  When writing the sentence make sure to have an adequate amount of write space in between words. 

Students will then be asked to cut apart their sentences. My students all have support with this however they are expected to let the adult know where the sentence is supposed to be cut. The purpose of this is to have your students learn that the white space is separating words. 


Sometimes we have accidents....which is OKAY!!! This is a perfect time for a teachable moment. Simply let them cut it and correct them....then tape the words back together.


 Once the sentence is cut have them put it back together. I give my student a model to follow.


Thursday: BE THE SENTENCE. Write the words of the sentence on separate pieces of paper and hand them out to the kids....and maybe adults if you have more words than students. The students will then rearrange themselves (or your will help them) to form the sentence. You may need to have a model available and A LOT of patience for this lesson!!!

Friday: Make the book. Use the sentences the students cut up on Wednesday and make a book. You could also make this on the computer if your students have goals in that area....mine don't so we not only use this time to re-visit our sentences but work on our fine motor skills. Have the kids look up pictures on the internet to match their sentence. You could also have kids bring in pictures (since you will know what their sentence is on Monday...they will have time).

**Yes my little guy is holding a glue stick all by himself!!!!!


Independent Reading: After your direct reading and writing instruction students should have the opportunity to do independent reading. This can look different for every student. You can have kids read on the iPad, read adapted books OR even read the books you made during previous weeks. Build your students stamina. I will admit during this time my staff or the iPad "voice" is reading to my kids. However....my students pick what they want to read. 

You could use some of the following sites for books online: Raz-Kids, Book-Flix, News-2-You (Free app if you have the online subscription), Storyline Online (free), and our new favorite Tar Heel Reader (free)!!


Independent Writing: You're probably thinking, how the heck are my students going to be able to write something. This is probably the hardest part of the whole process.  It is hard because it requires A LOT from the kids. However, it requires a lot from you and your staff too. You have to insure that everyone sticks with this....you can at times think "Why are we doing this?", "Will this ever happen?". 

We start by making sure every student has access to the ENTIRE alphabet and CORE vocabulary. This can look different for each student depending on their cognitive abilities. I have 2 students who have access to the alphabet and CORE words but only one at a time. I have another student who is able to look at the entire alphabet at once and has access to all of the CORE vocab and tons of fringe vocabulary. 

I then tape their paper to the desk. Trust me.....tape is your best friend!!!!


Students then tell us what letter they want by flipping through, shaking their head when we get to a letter etc. We then give them the writing tool and let them go. It is so important that you do not form the letters for them. This is INDEPENDENT writing time. I do have my staff write what the letter is supposed to look like next to their letter just so we know what they are trying to say. When kids are picking letters I try to relate them to words. For example: "Ohh, you picked L, maybe for lion or library or even Liam."


These writing pieces may look like scribbles to most but to everyone in my classroom these are the students work. These pages show the 10 minutes they put into writing for the day. These markings show the student was able to look at the paper for 2 seconds or hold a marker for 5 seconds without throwing it. Even though this may be the hardest part of the process to believe in, it is by far my favorite.

But just like in every classroom mine is not perfect....we too get frustrated and like to throw things. Don't get mad. They are just markers. The student can pick it up after they write.


I store all of the students work in a folder and pull it out everyday when we start our lesson. 

What are your thoughts about this literacy approach? Will you give it a try in your classroom? Do you see the benefit?

Thursday, October 22, 2015

Reading Block Activities

Reading instruction can often times be difficult in a special education class. There are so many fun and engaging reading lessons posted on Pinterest and teacher blogs but they are mostly geared towards the general education population.

Let's face it...as much as we try, those don't work in our classrooms. When I read a lesson I think, if I do that Johnny will walk away, if I do this Susie will act out etc. Now don't get me wrong, I do not limit my students and I challenge them daily, but I have had to find different ways of doing this.

I teach reading two times a day.  The students in my first group range in reading levels A- I (Fountas and Pinnell) and my students in the second group are still working on emerging reading skills.

For this post I am going to focus on how I structure my reading block for the first group. During this time I have 9 students and 2 para professionals. Here is a picture of my schedule break down during this time. My paras run the table work center and monitor independent reading while I teach group time.
Now you may be thinking I don't have names on this for confidentiality reasons, but honestly, this is what it looks like in my classroom too. I am always changing who is in which group so it is just easier to color code the schedule, rather than moving the kids names and reprinting each time.

Group Time: Here is my weekly outline for my lessons.

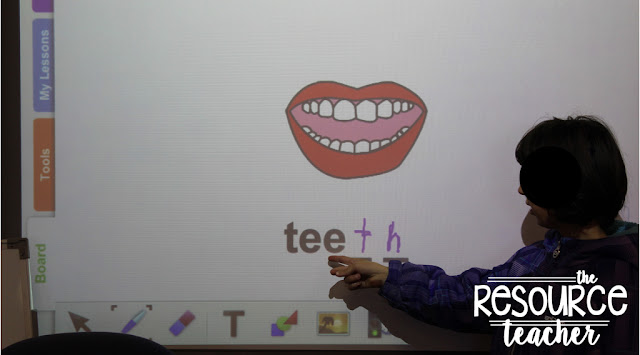
On Mondays I introduce the book to both groups. I use the Unique Learning Systems N2Y library to get my reading materials. I like the leveled library because a lot of the books have the same theme but are different levels.  I am also very fortunate to have a SMARTboard so I can just project them right on there but you can easily print these books or pull them up on iPads.

I read the book to the students and do a lot of "thinking out loud". Depending on time we may re-read the story. For my higher group I will have them taking turns reading a page. For my lower group I will select 1-2 words to have them help me with.

On Tuesday and Wednesdays I break apart the book and focus on the main skills needed for each group. My high group struggles with comprehension and my low group struggles with phonics. Here are some activities I do with the groups.

Group 1:

We first focused on identifying what "who" means. "Who tells a person or animal".


What I also love about using books from the N2Y Library are that I can grab the symbols used (or similar symbols) using Symbol Stix. I print and laminate picture cards for added visuals. After we go over the words I pass them out to the students. Some kids can handle having 2-3 cards while others can only have 1. As we read the story I ask questions and the students who have the answer are supposed to respond. This has been a huge hit in my classroom and I LOVE when I see the kids jump or start to wiggle because they realize they have the answer. This is a great way to keep them engaged during reading.


I also use that same skill but take the book away and pull phrases or sections from the story without the added picture supports and see if the students are still able to answer the questions. As you can see this week we had a strong focus on answering "who" questions.


Group 2:

We focus A LOT on phonics. This week we focused on the "th" sound. Hooked on Phonics has a ton of free videos on YouTube so I am always sure to check there when we are working on specific sounds. We may be cool but let's face it....kids love videos :)

We then practice the skill by adding the particular sound onto words.


We then generate lists of words that have the "sound" that we worked on. Most of the time the kids end up using the same words we just practiced but that is OKAY!! they are recalling information.

On Thursdays we re-read the story. This usually doesn't take very and it is a great time to work on comprehension with my low group and phonics with my high group. 

Table Time:

I find extension activities that correspond to the skill we are working on. Sometimes these are paper and pencil and sometimes they are more hands on. We also through in some time to work on our spelling words!


These are just a few activities that work in my classroom. I have found that using the same routine from week to week has allowed the kids to be able to develop a routine. Being able to know what is expected of them helps them regulate their behaviors. 

What kinds of whole group/small group reading activities do you do in your classroom?

post signature Follow my blog with Bloglovin

Sunday, October 18, 2015

Classroom Reveal 2015-16

Only 2 months late but it's finally here! It is not as clean as I would have hoped but I thought it was still important to share!


Door into classroom. I usually have our craft displayed. Here is our bee we made from Teaching Special Thinkers Art Packs. I also have our Severe Weather and Evacuation plan on the top of the door.


Right when you walk in I have student mailboxes, homework turn in bin, daily journals and Check In and Check Out Schedules. I also have my homework printed, copied and ready to go for the entire year in the black file crate. I use the Leveled Homework Bundle from The Autism Helper


On the wall on the right, when you walk in, I have our schedules posted. This way anyone who comes into my room (paras, ancillary, HS helpers, admins etc.) can figure out what we are doing or where the kids are. Even though my students spend the majority of their day with me, I do not teach in a self-contained classroom. All of my students have a different general education teacher, which all have their own schedules. Everything is posted here!!


Below our schedules we have a "How are you getting home" pocket chart. The kids put in how they are getting home. I like the students to do this to help build independence in their dismal routine. If they know how they are getting home they are more likely to be able to complete the task independently. It is also great for staff and subs to reference if needed.


This is my main teaching area. I always choose to have a u-shape for my student desks/tables. This allows for the kids to have their own personal space but I can also easily access their space if needed (for instruction or behavior management). I also like that there is still space in the middle for the kids to come and sit on the carpet. It provides a more intimate/contained space.


Behind our desks is our supply center. I have all student supplies (paper, crayons, markers etc.) on the left and all of our math supplies (counters, money, quick tasks) on the right. Our writing journals are located on top of the shelf along with our finished work bin, pencils and Clorox wipes :).


I am lucky to have double sided shelves. These shelves house our writing centers and table time tasks. I use table time tasks as "when you finish tasks" as well as for my students who have graduated from traditional T.E.A.C.C.H. tasks but still need structured activities.


Our middle table is used for word work and para instruction. My students complete the work work center independently everyday. Some tasks we do here are build words with magnet letters, play-doh and writing them on dry erase boards. Para professionals also work with students here during reading. I split my kids into 2 groups for reading instruction. They work on paper pencil tasks while I am teaching the other group.


Having a dedicated technology center has been great this year. Everything is in one location and the kids know that work is supposed to be done on the devices rather than play since they are sitting in desks. 


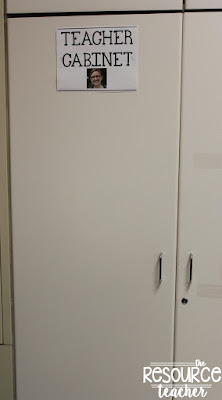
In the back of the room I have my teacher cabinet. That little picture of me is so powerful. The kids never even try to open the cabinet. Inside I have all of my teacher books and activities.


Teacher Center. This is where I house our visuals and laminator. I just used a tool organizer and labeled it with letters. It is so easy to locate what visual you are looking for :). 


This is our kitchen area. We make coffee for our Food Cart (that takes up most of the counter :).


Break area. This is where the kids spend their break time. They are able to pick games from the cabinet or hang out in the chairs. Here is a post about what I have in my choice cabinet and how it is organized. 


Our library. The students are able to pick books from the white bins. We use Fountas and Pinnell leveling system in my district. I have a list to the right that lets the kids know what bins they are allowed to choose from. The baskets at the top house our adapted books, theme books and teacher read alouds.


I used book shelves, filing cabinets and wall partitions to create a cozy work space. This is where my students do T.E.A.C.C.H.


We use this space for more independent work centers. As you can see we also store all of our bags for swimming and one of my students walkers. I let the kids work at the desk as well as on the floor as some tasks require a lot of space.


Our reading nook is one of the kids favorite places. They love that papasan chair...don't mind the hideous pattern :). We also have all of our book boxes in this space.


The last space in our room is my teacher area. I didn't take a picture of the desk because um...well it's a disaster!! But you get it, its a kidney shaped table :). This picture however is how I organize my students IEP goals/objectives work. Let's face it, not every task/lesson we do solely focuses on their individual goals. This is the way I have found that works for me. I work with the kids daily using these baskets. I put a page that has their goals and objectives listed as well as a few corresponding tasks. This is also a GREAT and easy way to be able to get data.

Thanks for taking a look at our classroom. What is your favorite place?

post signature Follow my blog with Bloglovin